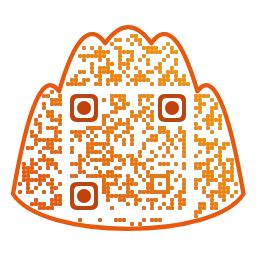
Make a QR Code in the Shape of Your Image or Emoji: A Silhouette QR Guide
From built-in shapes like hearts and dumplings to your own emoji or image silhouette. How shaped QR codes work, removing backgrounds, positioning, combining style and shape presets, and print tips.
- Published
- Updated
Most QR codes are plain squares. But what if yours were a heart, a dumpling, your favorite emoji, or the silhouette of your shop's mascot? A shaped code gets noticed, and the shape alone tells people what it is for. This guide walks through how to pick an overall shape in Mandu QR, or turn your own emoji or image into a silhouette. The general reasons decorated codes still scan (error correction, quiet zone, contrast) are covered in a separate article, so this one stays focused on the practical work of building the shape.
How a silhouette QR works: a real code in the middle, decoration around it
A shaped QR code does not mean squeezing the code itself into a heart. A scanner could not read that. Mandu QR keeps an ordinary square QR body in the middle and fills the rest of the chosen shape with decorative dots around it. Your eyes see a heart or a star, while the camera reads the body in the center.
A blank band separates the body from the decoration. It works like a margin for the body, so the decorative dots never blend into the real modules. Decorative dots are placed only on cells that sit fully inside the shape, which keeps the outline crisp.
- Body: the real QR that carries your data. Its structure does not change when you change the shape.
- Blank band: the margin between the body and the decorative dots.
- Decorative dots: the dots that fill the shape and form the silhouette. They carry no data.
Whatever shape you choose, the body is still the original code, so the scan result is the same. Mandu QR also tries to read the preview as you edit, so you can see the result right away. If a shape is too narrow to hold the body, the body is widened slightly beyond the shape and a notice appears. A fuller shape keeps the silhouette cleaner.
The nine built-in shapes and how to choose
The built-in overall shapes are square, circle, heart, star, speech bubble, cloud, rounded square, dumpling, and bride-and-groom. Add the emoji and image options and you have eleven to choose from. Under Overall shape in the editor, one click applies the choice.
- Square: the default, with no decoration. It is a regular QR.
- Circle and rounded square: they leave generous room for the body, so they are the most dependable. Good for menus, business cards and stickers.
- Heart and star: pointed corners and notches leave relatively less room inside. They look great, but print them a little larger.
- Speech bubble and cloud: a natural fit for chat, reviews and support links.
- Dumpling: the signature shape of Mandu.
- Bride and groom: a couple shape made for wedding invitations and guest information.
The shape outline option draws a thin line along the edge of the shape. Turn it on when the decorative dots alone leave the silhouette looking soft. The dumpling and wedding presets start with the outline already on.
Making an emoji or image shape
Choose Emoji under Overall shape and the emoji picker opens. Tap one from the list, or type a single emoji into the input field. The emoji as drawn by your browser becomes the silhouette, and the inside of it is filled with decorative dots.
- Choose Emoji under Overall shape.
- Pick an emoji in the picker, or type one into the single-emoji field.
- Check the silhouette and the position of the QR body in the preview.
- Adjust the position and size if needed, as described below.
Emoji made of several characters, such as family emoji or flags, count as one and work fine. If you enter more than one, only the last one is kept, and anything that is not an emoji triggers a prompt asking for a single emoji.
Emoji look different on different devices and operating systems, so the shape on your screen may differ slightly from what someone else sees. The file you download matches what you see in the preview.
Choose Image under Overall shape, then pick a PNG, JPG or WebP file. Files up to 15 MB are accepted, and an image with a transparent background gives the best result. If the image is not transparent, a light background connected to the edges is treated as the outside and left out of the silhouette.
Your image is processed only on your device and is never sent to a server. Recently used images are kept in this browser only, up to eight of them, so you can pick them again. You can remove them one by one or clear them all.
A good silhouette image is simple: a clear outline, big solid areas, and mostly filled-in interior. Mascots, logo outlines, animal silhouettes and hand-drawn doodles all work well.
- A transparent PNG gives the most accurate outline.
- Thin lines or many detached pieces leave too few cells for decorative dots.
- A large hole inside counts as outside the shape.
- Very long, thin shapes shrink the body, so avoid them.
Turning a photo into a silhouette with Remove background
A photo usually comes with a background, and uploading it as is turns the whole rectangle into the shape. After you upload an image, a Remove background button appears. The editor opens only when you press it, never automatically. Whatever you keep becomes the new silhouette.
- AI selection: tap the part you want to keep and the tool finds that subject. Tap several times to combine selections.
- Edge auto-removal: finds the most common color along the border and erases only the background connected to the edges. The same color inside the subject is left alone.
- Eraser and restore brush: sizes from 1 to 150 px. The restore brush only brings back what was originally opaque.
- Undo and reset: up to 30 steps of undo, and even a reset can be undone.
The AI runs on a model inside your browser, and neither the image nor your taps are sent to an external server. The model loads the first time you use the AI tool, and if graphics acceleration fails it retries on the CPU. If the AI fails, the manual tools keep working.
When you finish, the shape is recalculated from the pixels you kept, and the QR body returns to its automatic position. If you are not happy, Restore original brings back the silhouette of the first image you uploaded. Cancelling the editor keeps the current image unchanged.
Adjusting the position and size of the QR body
With the emoji and image shapes, a QR position group appears. Automatic placement finds the largest square that fits inside the shape. You can usually leave it alone, but moving the body is useful when you want to avoid a drawn face or correct a lopsided shape.
- Drag: grab the QR body in the preview with a finger or mouse. Touch is supported.
- Horizontal and vertical position: sliders from 0 to 100%.
- QR size: 40 to 100% of the automatic size. The blank band between body and decoration shrinks by the same ratio.
- Auto position: clears the manual setting and returns to the original placement.
While you drag, the scan check is skipped, and it runs again once you let go. Export stays disabled until that check finishes. If the body drifts outside the shape or overlaps an inner hole, a warning says the QR body goes outside the shape. The body is never cropped, so just adjust the position or size until the warning goes away.
Choosing another shape, changing the emoji, or uploading or removing an image resets the position to automatic, because the old coordinates no longer mean anything. Changing the style preset, on the other hand, keeps your manual position. Built-in shapes such as the square and circle do not use manual placement.
Combining style presets and shape presets
Presets in Mandu QR come in two kinds. Styles control color, dot shape, eye shape (the big squares in the corners) and frame. Shape presets are Cafe Menu, Pink Heart, Dumpling and Wedding. The two are chosen independently.
- Picking a style changes only color, dots, eyes and frame. Your overall shape, outline, emoji or image shape, its position, and the decoration opacity all stay.
- Picking a shape preset changes only the shape and its own settings. Leftovers such as an outline or position from the previous shape are cleared.
- The shape preset's colors are applied only when the current style is the default Minimal. If you already chose another style, its colors are left alone.
- A logo you uploaded is never removed or overwritten by any preset.
That means the order is up to you. Set the shape with Pink Heart, then tap the Pastel style: the heart stays and only colors and dots change. Choose a style first and a shape preset afterwards, and the style stays too. If you edit one side by hand, only that side loses its selected mark.
Decoration opacity appears for any shape other than the square and offers 100% or 60%. At 60% the decoration is lighter than the body, so the body stands out while the shape reads like a soft backdrop. If the decoration steals attention from the code, try 60%.
Ideas and print tips
Shaped codes shine where the QR itself is the star. The ideas below are suggestions, not promises of results.
- Cafes and restaurants: the Cafe Menu preset in a round shape suits table stickers and cup sleeves.
- Weddings: use the bride-and-groom shape on the back of an invitation or on a guest information card.
- Profiles and social: use your signature emoji or character as the shape for a link-in-bio page.
- Events and team merch: make stickers or shirts with a QR in the shape of your team mascot.
- Shop promotion: the speech bubble fits a request for reviews or a contact channel.
Printing needs a little extra care. The body is only part of the total size, so at the same printed width it is smaller than in a regular code. Shapes where the body takes up a smaller share, such as the heart or star, need to be printed larger. The right minimum size depends on reading distance, content length and printer, so testing beats trusting any single number.
- Print one copy at the real final size first.
- Scan it with the built-in camera on both iPhone and Android.
- Scan from the distance and under the lighting where people will actually be.
- Check that the page that opens is the one you intended.
- If you will use the downloaded file, check that file rather than the editor preview.
If you lowered the decoration opacity to 60%, the decoration may nearly vanish in black-and-white printing or on thin paper, so check in a test print that the shape still shows. The body is not affected, so this is about looks, not scanning. For print work that needs vector graphics, saving as SVG instead of PNG is also an option.
Try it in Mandu QR
Mandu QR is a free tool that runs in your browser with no sign-up. What you type and the images you upload are processed on your device and not sent to a server. Start by picking one built-in shape and confirming it scans, then move on to an emoji or image shape and fine-tune the position and size. Changing one thing at a time makes it easy to find the cause if something stops scanning.